Monday, February 2, 2015

Christmas 2014: Christmas Jelly Wreath


A Pinterest inspired dessert, this one is another easy one for Christmas, but not so quick - only because of all the setting time required for jelly making. I was originally after a Christmas dessert I could make the weekend before Christmas, but found this and fell in love with it instead. As it turns out, jelly only lasts 3 or so days (according to the jelly box) so you can't make it too far in advance, but the day/night before is a must simply for setting times.

Once again though, this one was loved by all who saw and tasted it, so it might pop up again at future Christmases if I ever become less motivated to try something new each year!


Ingredients:
- 1 packet of red jelly (I used 1, recommend using 2 though)
- 1 packet of green jelly (I used 1, recommend using 2 though)
- 740g can of condensed milk
- 3 tablespoons gelatine powder (check instructions on gelatine packet, may differ)
- water

Method:
Step 1: Make the red and green jelly according to packet instructions and refrigerate to set. Once set, tip it out and cut/break it into small cubes/pieces. I can recommend using rectangular containers to set the jelly in because its much easier than say, the round container I used in the photo below for the red jelly.


Step 2: Put the red and green jelly pieces into a lightly greased wreath shaped / bundt cake tin.


Step 3: Sprinkle gelatine powder over 1 1/2 cups of cold water and allow gelatine to absorb the water. Stir in 1 1/4 cups of boiling water until gelatin is dissolved and then stir in the condensed milk. Allow to cool to room temperature.


Step 4: Pour condensed milk gelatine mix over the red and green jelly in the cake tin and refrigerate until set.


 Once it has set, it'll look like this -


The red and green jelly all floated to the top of the unset mixture, which meant it was on the bottom of the set mixture once it was turned out onto a plate. Next time, I'll double the red and green jelly mix to see if it is more evenly spread through.

Delicious and looks good even if it doesn't look as good as I wanted it to! ;-)


Christmas 2014: Chocolate Christmas Tree Cones


I kept it pretty simple for Christmas this year, and I must say, I was nice not being flat out and working until midnight on Christmas Eve - I could definitely get used to it!

First up we have a really easy and surprisingly yummy dessert - Chocolate Christmas Tree Cones. These got a lot of positive, surprised reviews from the family over Christmas; there were a lot of remarks along the lines of 'these are surprisingly yummy' ... I don't know what that says for the faith my family members have in my dessert abilities, but I'm not going to dwell too much on that and we'll just focus on the positive reviews!

Very easy and fairly quick, I finished up and felt a little weird because it had all been too easy, I thought surely its meant to be harder than this... but no, it wasn't. Its really easy, and one I might try making with Jnr Pink in a year or two.

Ingredients: 
- store bought icecream cones
- large packet of shredded coconut
- green food colouring
- M&Ms / Smarties
- white chocolate melts (one pack, maybe 2 depending on how many you want to make)
- milk chocolate melts (a quarter to a half a pack)
- chocolate coins


Method:
Step 1: Put the shredded coconut into a bowl and add a few drops of food colouring. Mix it through with your hands or a spoon (best done with your hands) - I used food grade plastic gloves so I didn't end up with green fingers!

This is the step that takes the longest... purely because you want to refrigerate the coloured coconut overnight so that the colour doesn't run.


Step 2: Melt the white chocolate in a glass bowl over gently simmering water in a saucepan. Once melted, add some green colour, and pour into a tall glass. (I used one of Mr Pink's beer glasses and got into trouble, apparently thats not something a good wife does, so maybe try to find different kind of glass to use for this!

Step 3: Dip a cone into the melted chocolate glass and then roll in the shredded coconut.


Step 4: I then sat each of the cones into a tall glass to 'set' and then put a bunch of Smarties into each. (I was allowed to use the beer glasses for this purpose...)

Step 5: If you have any white chocolate left over, use it now, otherwise melt some milk chocolate (or more white chocolate) and then pipe a circle onto the open end of the cones. For some reason I don't have a photo of it, but I then placed a chocolate coin onto the end to seal the cone.


Teddy Bear Cake


For Jnr Pink's 1st birthday I decided to throw a Teddy Bear's Picnic themed party, so of course I had to make a teddy bear cake! (Ok, you got me, I may have decided on the cake first and then found a theme to match just so that I could make a teddy cake!)

First I was looking at buying a teddy cake tin but then I saw THIS and the challenge was laid down.

Once again I am going to ignore the 'quick and easy' tagline of this blog for this particular one, but its a freakin teddy bear cake, I mean c'mon, I couldn't not do it!

I'm going to skip the actual making of the cake and icing, but they are all mudcakes (mudcake was the only dense and strong enough cake I could think of to withstand the massive weight required to construct the teddy). The body was a combination of made and bought chocolate mudcakes, and the head was made from my white chocolate mudcake recipe.


So, what you need then...
- 7 mudcakes. (I made them in the week leading up to the birthday party, another reason to use mudcake - it lasts really well)
- chocolate ganache (equivalent of covering about 3 cakes)
- white chocolate ganache (enough to cover one full cake -inc. sides)
- toothpicks
- 2 chopsticks
- round cookie cutter
- lots of butter
- lots of icing cusgar
- fondant icing (I bought a ready made packet)
- brown food colouring
- 2 maltesers/chocolate bullets/something to use as eyes
- 1 chocolate coin or something similar, or better yet, a chocolate triangle of some kind!


Method:
Step 1: Layer 3 of the chocolate cakes one of top of the other using the chocolate ganache as glue to hold them together and pierce them with the chopping sticks to firmly hold them in place.


Use a large knife to cut at an angle on the top 1 and a half cakes to create a more 'body' like shape. Note that you don't want to make it too small a circle on the top because the head still has to have enough support under it  when you place it on.

Step 2: Use a scrap piece of paper to sketch out an arch for the teddy's feet and then cut the shape from one of the left over cakes.


 Step 3: Scrunch up some of the leftover scraps from when you shaped the top 2 cakes on the body into cylinders / balls (whatever works best for you, I tried for cylinders but ended up with more like balls - you can fix the shape with the first layer of buttercream icing anyway!)


Step 4: I found the the angle I cut the top cake of the body at, left me with 2 perfectly shaped arms for the teddy bear. If you don't get this though, you could potentially use the same cake as the feet  to sculpt feet and arms out of if you fiddle with the sizes of each.

Step 5: Use toothpicks to attach the arms to the body of the teddy - use as many as you need, just remember they're there when you are cutting up and serving the cake!


Step 6: Use white chocolate ganache to glue the white chocolate mudcakes together. Using a large knife, sculpt the two cakes into the shape of a head - remember, less is more! Don't go mad and cut too much off too early or you'll be left with a teeny tiny head!


Step 7: From the off cuts of the head, use the round cookie cutter to cut out 2 ears for the teddy, and a nose.

The ears can be made from edges that have an edge to them already - this will help them be placed onto the head.


I cut the nose from a curved offcut of cake, so that it could sit against the head better.


Step 8: Use toothpicks and ganache to attach the ears and nose, cutting them as necessary to fit snugly against the head.

Step 9: At this point it was late at night so I wrapped the teddy up in cling wrap for the night so that I could get some sleep, and continued bright eyed in the morning.


Step 10: Make a heeeeap of buttercream icing, I can't remember exactly how much I did, but probably enough to cover about 5 normal cakes (inc. sides). If you need more, just make more. And if you have too much (unlikely) you can eat it!

Use a dash of brown food colouring so that the underneath layer of icing doesn't stand out toooo much (admittedly, mine probably wasn't brown enough but I couldn't be bothered at the time to make it browner!). Cover the teddy in the buttercream icing, filling in the gaps where necessary (e.g. leg and foot joins).


Step 11: Roll out the fondant icing and knead a small amount of brown food colouring through it. Cut it into required shapes to cover the pads of the feet, the inner ears and the nose.


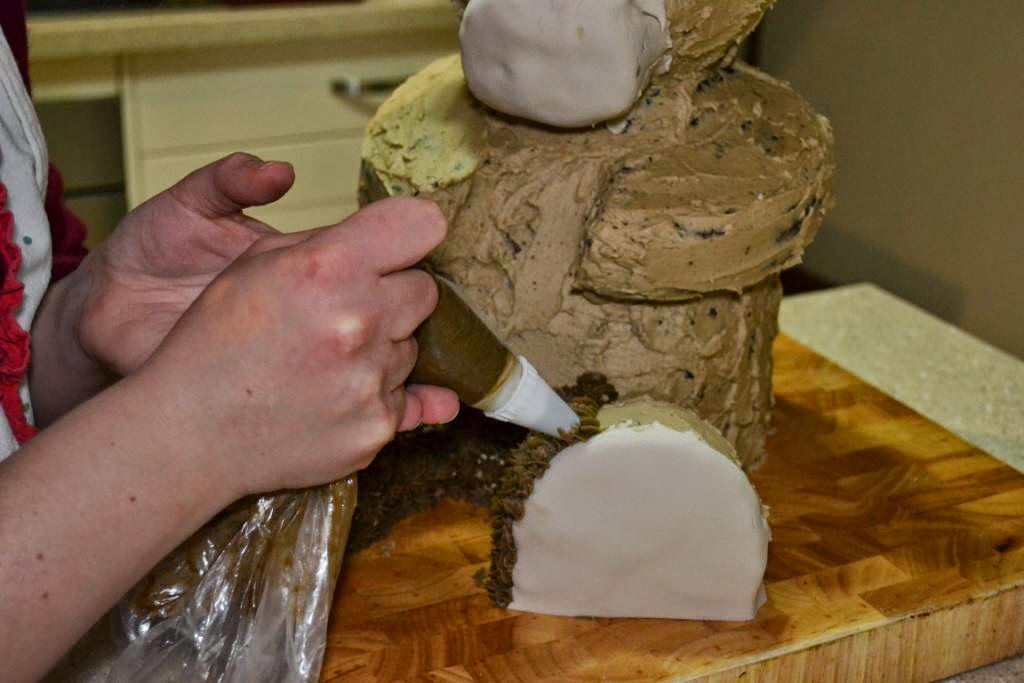
Step 12: Mix up about the same amount of buttercream icing again (this time I made it a darker brown) to make the teddy's fur. Using a large star shaped piping end (as starry/pointy as you can get) pipe the icing onto the bear, starting at the bottom and working your way up.


Step 13: Once you've piped the entire bear, press the maltesers onto the teddy as eyes, and use the left over icing to glue the chocolate triangle onto the nose. Using a sharp knife, score from the point of the nose down to the chin/neck of the bear.

And Voila! You have yourself a teddy bear cake! 


Dutch Speculaas


For my Oma's birthday last year I decided to honour my heritage and have a go at baking some traditional speculaas. They were one of my dads favourites and have become favourites for his children and grandchildren as well, so I figure I'll likely be making these again and again and again for the entire family...

Around the time that Jnr Pink arrived, I became addicted to our local Facebook Buy, Swap & Sell page, and one day I came across a traditional wooden speculaa mould so of course I snapped it up!


After much Googling, I decided on this recipe as the easiest 'traditional' recipe I could find. For those too lazy to click on the link (my hats off to you coz thats pretty lazy...) I've included the recipe below.

A note on the level of quick & easiness - I use the wooden speculaa mould which meant that this was definitely not quick. If you don't have a mould and just want to use normal cookie cutters, its fairly quick and easy (but won't look as good! ;-) )

Ingredients:
1/2 cup (or 113g) cold unsalted butter
1/4 cup + 2 tablespoons (75g) white granulated sugar
3/4 cup (165g) packed dark brown sugar
1/4 teaspoon baking soda
1/2 teaspoon kosher salt
2 1/2 teaspoons ground cinnamon
3/4 teaspoon ground nutmeg
3/4 teaspoon ground cloves
1/2 teaspoon ground ginger
1/4 teaspoon ground white pepper
1/4 teaspoon ground black pepper
1/4 teaspoon ground cardamom
1 1/2 teaspoons pure vanilla extract
1 large egg
1 3/4 cup (235g) all purpose flour

**made me about 40 speculaas, but it depends on the size of the mould or cookie cutter you're using.

Method:
Step 1: Line a baking sheet with baking paper.

Step 2: Cut butter into 1/2 inch cubes and place into a bowl.Add the sugars, baking soda, salt and spices.

Cream the butter and dry ingredients together on medium speed for 30 seconds or until the batter is uniform in colour.


Step 3: Scrape down the sides and add the vanilla extract and egg; beat on medium speed until incorporated.


Step 4: Scrape down the sides again and add the flour; beat on medium speed until incorporated.


Step 5: Split the dough in half, wrap each half in cling wrap and refrigerate for a couple hours or overnight.


Step 6: Spray the wooden mould with cooking oil (lightly) and then sprinkle flour over it. Break off a handful of dough and use a rolling pin to spread over the mould.


Carefully peel away the dough from around the edges of the mould - a small knife can be helpful here to get the edges. You'll get a feel for how hard to press the dough into the mould as you go along, its a fine line between not pushing enough that the pattern doesn't show, and pushing too hard that you can't get it out of the mould!

Step 7: Turn the wooden mould over and tap the speculaas out onto a sheet of baking paper.


Step 8: Place the baking sheet with speculaas in the refrigerator for 30 minutes.  Preheat oven to 190degrees Celcius.


Step 9: Bake speculaas for 9-11 minutes or until they are golden brown on the edges. Let cool on the baking sheet for 10 minutes before moving to a wire rack. They will harden as they cool.


They didn't keep their shape/pattern as well as I'd hoped during the baking process, but they are still patterned enough so I'm happy with them. Oma was very pleased with them and said that they tasted wonderful, so I take that as a good indication that the recipe is fairly 'traditionally dutch'.