For all you dessert-lovers out there, this is for you. I specialise in quick and easy desserts that are sure to impress! ;-)
Monday, April 18, 2011
Hot Cross Buns
I made these in early March... a little early for the Easter festivities maybe, but I do love my hot cross buns and I was excited :-)
Not so quick but it is fairly easy to make if you've got some time up your sleave.
Ingredients: Makes 16
- 1/3 cup caster sugar
- 4.5 tsp dry yeast
- 1 1/2 cup warm milk
- 600g plain flour
- pinch salt
- 1 1/2 tsp ground cinnamon
- 1/2 tsp mixed spice
- 60g butter, chopped
- 1 egg, lightly beaten
- 2/3 cup sultanas
Paste for crosses
- 1/2 cup plain flour
- 4 tbsp water
- 2 tsp caster sugar
Glaze
- 1 tbsp very hot water
- 1 tsp gelatine powder
- 1 tbsp caster sugar
Method:
Step 1: Combine caster sugar, yeast and milk in a bowl, stir until smooth, cover and rest in a warm place for 10min or until frothy. Its a little hard to see in the photo but the one on the right is frothy...
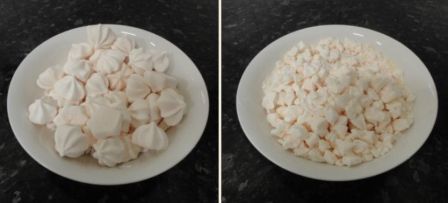
Step 2: Sift flour, salt, cinnamon and mixed spice into a large bowl. Use your fingertips to rub butter into the flour mixture - be warned, this is tiring! My fingers start to ache after a minute or two, and there seems to be a never-ending supply of butter that needs to be rubbed in! But stick with it, you'll get there... eventually! And then you'll end up with something like this:
Step 3: Stir in yeast mixture, egg and sultanas until well combined. Cover and rest in a warm place for 45 minutes or until mixture has doubled in size.
Step 4: Preheat oven to 220degreesCelcius.
Step 5: Turn dough onto a lightly floured surface and knead until smooth and elastic (about 5min). Divide dough into 16 even pieces and roll into balls. Place balls into a lightly greased square cake pan lined with baking paper. Rest covered for 10-15min or until balls have risen to the top of the pan.
Step 6: Combine paste ingredients in a small bowl and, using a piping bag or a sandwich bag with the corner snipped off, pipe crosses over the buns.
Step 7: Bake for about 20minutes or until well browned and cooked. Combine glaze ingredients in a small bowl and stir until sugar is dissolved. Brush buns with warm glaze and cool on a cake rack.
Mrs Pinks' little piece of advice: if you're planning on packing your hot cross buns into a container for storage or transport, I would consider holding off on the glaze. Once you glaze them, the buns become quite sticky and will stick to each other or whatever else they touch.
Butterscotch Self-Saucing Pudding
This one was a request from my dad for his birthday and even though I gave him the opportunity to pick something tricky if he wished, he chose butterscotch pudding - easy, quick and yummy. Gotta love him ;-)
Ingredients:
- 3/4 cup brown sugar
- 1 1/4 cups (190g) self-raising flour
- 100g butter, melted
- 1 egg
- 1/2 cup (125ml) milk
- 4 tbs golden syrup
- 1 tbs cornflour
- ice-cream to serve (or if you're one of those crazy people who like pudding with cream instead of ice-cream, double cream to serve)
Method:
Step 1: Preheat oven to 180degreesCelcius. Grease a 1.5 litre (6 cup) ovenproof dish.
Step 2: Combine 1/4 cup brown sugar and all of the flour in a bowl.
Add the melted butter, egg, milk and 2tbs of the golden syrup and stir until combined. Spoon into greased dish.
Step 3: Combine the remaining 1/2 cup of brown sugar and cornflour.
*Small note of thanks to Mr Pizzaman for his artistic photography above! ;-)
Sprinkle over the pudding mixture.Step 4: Combine boiling water with the remaining 2 tbs of golden syrup. Pour over the top of the pudding mixture.
Bake for 40-45min or until skewer inserted into the centre comes out clean.
Step 5: Serve with ice-cream (or for crazy people, double cream... whatever takes your fancy)
Sunday, March 6, 2011
Choc-Brownies with Caramel Sauce
I'm a sucker for anything chocolatey and hot (especially when served with ice-cream) and this one satisfies all of that PLUS has a yuuuummy caramel sauce as well - soooo good! (A little messy lookin, but gooood!)
Took me less than 30min to make (including cooking time) and serves 6
Ingredients:
- 80g butter
- 150g dark chocolate
- 3/4 cup (150g) firmly packed brown sugar
- 2 eggs, beaten lightly
- 1 tsp vanilla essence
- 3/4 cup (110g) plain flour
- vanilla ice cream (to serve)
- 1/3 cup (45g) vienna almonds, chopped coarsely
Caramel Sauce
- 2/3 cup (180ml) cream
- 60g butter
- 3/4 cup (150g) firmly packed brown sugar
Method:
Step 1: Preheat oven to hot (I hate it when recipes do this - what the heck does 'hot' mean?! I think I went with somewhere around 190degrees celcius but it would be nice if they actually specified exactly what temperature 'hot' is! Anyway, I didn't burn them and they seemed cooked enough...)
Grease 6-hole muffin tray (surprisingly I forgot the greasing step and had some difficulty getting the brownies out of the tray at the end, so may I suggest that you don't forget like I did... if you can help it...)
Step 2: Combine butter, chocolate and sugar in medium saucepan; stir over medium heat until smooth.
Step 3: Stir in egg, essence and flour. Divide the mixture into the muffin tray and cover tightly with foil. Bake in hot oven for 20minutes and then stand for 5minutes.
Step 4: For the caramel sauce, combine ingredients in na small saucepan, stir over 'medium' heat (again with the ambiguous temperatures!! I used 4 on our 6 point stove-top scale) until smooth. Simmer for 2 minutes.
Step 5: Place brownies on serving plates, top with ice-cream, caramel sauce and almonds (I completely forgot to put the almonds on it and it was fine without, but I'm sure the almonds would have made it eeeeven yummier!)
Wednesday, February 23, 2011
Berry Meringue Cream Delight
This one was an unintended invention test that I set myself when I discovered Bilo didn't have coconut macaroons which was meant to be an ingredient... Plus I realised after the fact that I forgot to add custard to the cream... Despite this, I managed to get rave reviews from both Mr Pink and Mr Pizzaman who were very impressed with my creation!
This one made 4 serves, and took less than 15minutes from start to finish - I dont' think I'll ever have another dessert that is done in only 3 steps!
Ingredients:
- 300ml thickened cream
- 2tbs sifted icing sugar
- 100g meringue (I used a box of little star-shaped meringues from Bilo)
- 200g mixed berries (I used strawberries, raspberries and blueberries)
- chocolate flake (or similar) to sprinkle over top
Method:
Step 1: Whip cream and sugar in a bowl with electric mixer until soft peaks form.
Step 2: Crush meringue(s) and then fold into the cream
Step 3: Layer berries into serving glasses with berries and top with crumbled chocolate flake.
Wednesday, February 16, 2011
White Chocolate & Strawberry Muffins
Sooooo yummy, especially when they are warm!
Makes 1 1/2 dozen muffins
Ingredients:
- 225g unsalted butter
- 225g caster sugar
- 225g self-raising flour
1 tsp baking powder
4 eggs
1 tsp strawberry essence
100g white chocolate chips
Icing:
200g cream cheese, softened
175g icing sugar, sieved
1 tsp vanilla essence
3 tbsp unsalted butter
3 tbsp chopped fresh strawberries (this is how much I used, and I thought there could be more... so I would recommend upping this to 5tbsp or so)
Method:
Step 1: Preheat oven to 175degreesCelcius. Place 18 baking paper cases in muffin cases.
Step 2: Combine the butter, sugar, flour, baking powder, eggs and strawberry essence in a medium bowl. Beat with an electric whisk until light and creamy, about 2-3 minutes. Stir in the chocolate chips. Note: I used chocolate chips that were about 1.5cm in diameter but they tended to all sink to the bottom of the muffin, so next time I'll be using small chocolate chips)
Step 3: Spoon the batter in to the cases and bake for 20min.
Remove tins from the oven and cool for 5minutes. Then remove the muffins and cool on a rack.
Step 4: To make the icing, beat the cream cheese, icing sugar, vanilla and butter until smooth and creamy.
Stir in the chopped strawberries and spread on top of cooled muffins.
Note: I'm not really a cream cheese person... And although I liked the icing, I think I actually preferred the muffins with no icing and warmed in the microwave for 10-15seconds.
Honey Pear Tarte Tatin
This one received hearty accolades from both Mr Pink and Mr Pizzaman, which is all the proof you need, to know that its a good one! And there's no sugar in the ingredients so it must be healthy! (Yes yes, I am choosing not to realise how much sugar is in honey...)
Serves 6 and ready in less than 30min!
Ingredients:
- 150gm honey
- 3 beurre bosc pears, quartered (recipe online actually says 2 1/2 pears, but I used the whole 3 pears so I guess my cake pan may have been bigger or the pears may have been smaller... regardless, don't make my mistake and look forward to eating half a pear only to discover there's none left!)
- 375gm sheet of butter puff pastry
Honey cream:
- 200gm double cream
- to taste: honey
- 1 vanilla bean, scraped seeds only
Method:
Step 1: Preheat oven to 200degreesCelcius.
Step 2: Cook honey in an 18cm-diameter cake pan over medium-high heat for 5 minutes or until dark caramel colour, remove from heat and let bubbles subside.
Step 3: Arrange pears over honey caramel, overlapping slightly, and stand until caramel cools.
Step 4: While the caramel cools, make the honey cream: For those who haven't done it before (like me!), to get the vanilla seeds out you have to awkwardly slice the vanilla bean in half length-ways and then gently scrape a knife along the inside of the halves to collect the seeds.
Combine ingredients in a bowl, whisk until smooth and set aside - Note, it doesn't take long to whisk! I stupidly whisked a teeeeensy bit too much and it became too stiff... still yummy, but too stiff.
Step 5: Using a plate slightly larger than the cake pan as a template, cut a round of pastry (as best you can if you're using frozen pastry like I do you'll end up with an octagonal shape but it does the job... for the most part) Place the pastry over the pears, tucking in edges then bake for 20min or until pastry rises and is dark golden in colour.
Step 6: Stand for 5 minutes then place a large serving plate over cake pan and carefully invert onto the plate (be very careful as the caramel will be hot!) At this stage I drained a fair bit of the honey away because it was so runny - not sure if it would have set and been fine anyway, but there was plenty of honey to the tart anyway!
Serve with the honey cream and enjoy!!
Wednesday, February 9, 2011
Creme Brulee
Santa (aka Mummy and Daddy) gave me a Creme Brulee Set for Christmas, and it was about time I gave it a go... What followed was not exactly a disaster, but I think I'll definitely need to practice this one. One or two of the four I made turned out 'ok', so although this is a fairly quick dessert (if you dont count refrigerating time of 2-3hrs, which I reckon you shouldn't if you make it the night before!), apparently its not so easy to get right...
Ingredients:
- 1 cup cream
- 2 tablespoons caster sugar
- 2 large eggs
- 1/2 teaspoon vanilla essence
- Extra 1/3 cup sugar
Method:
Step 1: Preheat oven to 150degreesCelcius.
Step 2: Combine cream and 2 tablespoons sugar in a saucepan over medium heat. Stir occassionally for 5-6 minutes until small bubbles begin to appear around the edges of pan. -This may have been my first mistake; I walked away for a minute and when I came back it was bubbling a fair bit... So, lesson to be learnt: don't walk away at this stage!!
Set aside.
Step 3: Beat egg yolks and vanilla in a bowl until light and smooth. Gradually pour hot cream into egg yolks while stirring constantly, until well mixed.
Step 4: Strain mixture through a fine sieve and pour evenly into 4 ramekins. Possible mistake number 2: I noticed when I poured it into the ramekins that they didn't all look the same - some had a slightly frothy top, others did not... Maybe I should have strained it twice??
Step 5: Place ramekins into a bain-marie (baking dish with boiling water up to halfway on the ramekins). Cover pan loosely with aluminium foil - possible mistake number 3: foil may not have been 'loose' enough...
Step 6: Bake for approximately 25min until set. Possible mistake number 4: After 25 min they still didn't look set, so I left them in another 15min (checking on them every few minutes)... they still weren't all 'set' but at that point I figured they weren't ever going to...
Remove carefully from oven, cool, then refrigerate for 2-3hrs.
Step 7: Sprinkle extra 1/3 cup of sugar evenly over the custards.
Using a circular motion, heat the sugar with a Creme Brulee Torch. Continually move the flame over the sugar until it mels and becomes golden brown and bubbly.
Tip: add sugar and then torch it one ramekin at a time... I found that by the time I got to the 3rd and 4th ramekins the sugar had sunk into the custard. Now this could just be because the custards didnt 'set' like they were meant to but I figure it can't hurt to do it one at a time anyway
Subscribe to:
Posts (Atom)